Showing posts with label quick meals. Show all posts

Wednesday, October 20, 2010

Memories that Nourish, Tastes of Home


I know Proust already said it, and lots better than I ever could, but isn't it amazing how one taste or a waft of aroma can instantly transport us to another time and place in our lives? When I smell gingerbread it's Christmas-- and I'm decorating gingerbread men for the tree with DS and the was-band.

For me, popovers are a memory food.

The year that I was three, my mom, my sister, and I lived with my grandparents (my dad's parents) in Port Orchard, Washington.

My grandparents, Elva Isham Brown & Stephan J. Brown, Sr.


My grandmother, in the roaring 20's: a real fashion plate!

My dad had been stationed at Clark Air Base in the Philippines, and there was no housing for us, so we had to stay Stateside.


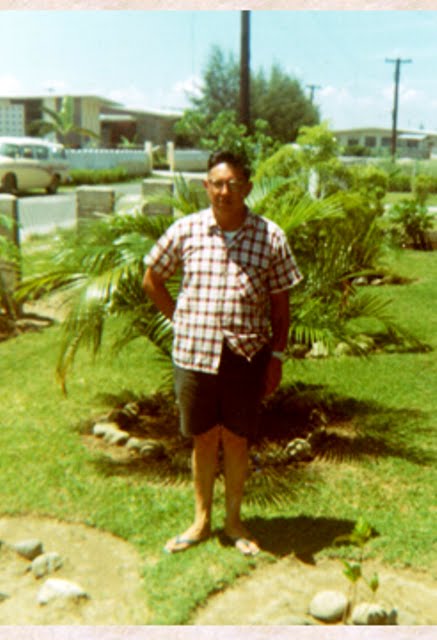
Dad in the Philippines

My grandparents happily welcomed us into the small, green house that my Grampa built with his own hands, when they left the Reservation for the West Coast during WWII.

Grampa and Great-Grandma Brown (his mom) by the front steps
I only met her once, when I was a toddler. She spoke no English, only Anishinaabemowin

The first floor revolved around a central staircase, and I remember that I used to race round and round the stairs, towing a little wooden dog on wheels by his red plastic leash (my favorite toy) in my wake. Grampa and Gramma never told us to "settle down" when we were playing, and my freedom was exhilarating. 22 years later, on a rare visit to Port Orchard, I felt the most intense thrill of recognition as I glanced into the toy basket by the stairs, and saw my battered little dog on wheels, now beloved by the great-grandchildren!

Gramma & I, at the ocean during a visit
(I was 11, and hated being the tallest person in my class)

That little green house was homely- Grampa never got around to sheetrocking the upstairs bedrooms-- but it was full of love.

Grampa & Gramma next to their house

It was always a magical place for me, and for vagabonds like us-- a new year, a new air base-- it was "home" for a good many years. Gramma and Grampa's door was always open-- and their modest home was frequently a safe haven for friends and relatives who might temporarily be down on their luck. Ironically, my grandparents never got over being homesick for Nett Lake, and to them, the Reservation, not Port Orchard, was always "home."

You never knew who might show up on the doorstep. My Uncle Chipper, home on unexpected shore leave, laden with presents. Maybe somebody's cousin's sister-in-law's brother, home on leave from Okinawa, or just out of jail for a drunk and disorderly, or just off the bus from Minnesota and flat busted broke. Someone was always visiting, and miraculously, there was always room for everyone, and everyone always felt welcome. It was just part of who my grandparents were: they would help anyone in need.

Kind of reminds me of the old Indian Country joke about the success of the post-Powwow 49 party: You know it was a good 49 when... you wake up the next morning and there are 50 strangers in your kitchen, cooking your eggs and bacon and calling you "Cousin!"

Everyone was family at the little green house on Locker Rd.

One of my favorite memories is lying in bed giggling with my sister on Sunday mornings, while the enticing smell of popovers in the oven wafted temptingly up the stairs. Although Gramma usually cooked, Grampa always made Sunday breakfast. And he always made popovers. We'd all sit at the kitchen table and my sister and I would stuff our popovers with jam and lick our sticky fingers. I had to be quick, though-- because in a flash, my mom would drag me over to the the kitchen sink and wash my hands so I wouldn't get jam-prints on the tablecloth. My sister, being older, was trusted to make proper use of her napkin.

My sister & I on Easter Sunday in Port Orchard
I believe there was some notion that I was to wear a hat for Easter Mass.
I promptly vetoed this idea.

My Grampa was the sweetest, kindest person I ever knew. He must have mellowed with age, because it was the stuff of family legend that as a young man, he worked as a cook in a lumberjack camp-- and had a cook's fiery temper, too! The closest thing I ever saw to this was Grampa's hearty exhortation to "Eat it or wear it!" on the rare occasions he made dinner.

Chicken pot-pie takes me back to family suppers on Sunday nights in the North Carolina house my parents proudly bought when my dad retired from the Air Force.

My parents, Stephan J. Brown Jr. & Elsie Brooks Brown,
on their first anniversary
(my mom was holding my sister, 2 weeks old, on her lap)


My parents, my sister, & me, a few months old
(you can see why there are almost no baby pictures of me!)

On Sundays, oh joy of joys-- we were allowed to eat on TV trays in the living room so we could watch Mutual of Omaha's Wild Kingdom, followed by The Wonderful World of Walt Disney. I had to rush to get bathed and into my PJs by the time supper was served, because the deal was, I had to go straight to bed after Disney.

After my bath, my mom would safety-pin a towel under my chin to make a super-hero style cape so my long, freshly shampooed hair (thank God for Tame-- remember that stuff?) would not drip on my jammies.

I always loved it best when we got to eat chicken pot pies-- the exotic Swanson's frozen chicken pot pies! I would surgically excise and remove the top crust and eat the filling with relish-- leaving the naked bottom crust untouched in its little tin. Just one bite of chicken potpie, and there I am again, in my towel-cape, listening to Marlin Perkins.

The recipe below is the double whammy of comfort food: Popovers filled with chicken and vegetables in a velvety sauce. It's a great way to use up those little odds and ends in the fridge, and it's quick and easy to make, to boot! I have successfully made both the popovers and the filling with unsweetened almond milk. DS has never noticed.

When the was-band and I lived in Wisconsin, on special occasions, we would eat at a charming restaurant (Quivey's Grove) that had once been a rustic farmhouse. Stuffed popovers were a trademark lunch dish at the restaurant. Kind of a fancy version of chicken and waffles, I guess, sans waffles! My version is below.

Chicken-Pot-Pie Popovers
by DomesticMuse


Popovers: Makes 6 popovers
1 1/2 c. milk
3 eggs
3 T unsalted butter, melted
1 t. salt
1 1/2 c. flour

Chicken-Pot-Pie Filling
2-3 T unsalted butter

3 T flour
1 1/2 c. milk, heated almost to scalding
1 chicken bouillon cube (preferrably Knorr)
1/4 t. dried marjoram
1/2 t. dried thyme leaves
8 oz. cooked, diced chicken
1-1 1/2 c. frozen peas and carrots
Chicken broth to thin the sauce if needed

First, get the popovers going.
Preheat the oven to 425 degrees. Thoroughly grease a popover pan. If you do not have a popover pan, grease 6 glass custard cups and set them well apart on a baking sheet. Space for the hot air to circulate is crucial to success.

In a blender, combine the milk, butter, eggs, and salt. With the motor running, carefully pour the flour in through the hole in the lid (do NOT run the motor with the lid completely off, trust me, you don't want batter in your hair and all over your kitchen.) Blend 2-3 minutes, until there are no lumps. Scrape the sides down with a rubber spatula at least once.

Pour the batter into the popover wells or custard cups, filling them about 2/3 full.

Now, this is important: Bake in a fully pre-heated oven for 30 minutes WITHOUT PEEKING.
If you open the oven door at the wrong time, all will be lost. No one will eat the resulting lumps of styrofoam. I speak from sad experience. A hot oven and undisturbed cooking time is the secret to feathery light, golden popovers.

If you prefer your popovers on the crisp side, briefly slide them out of the oven and poke a hole in each one with a skewer. Turn the oven off and let them sit in it for 5-10 minutes to crisp up.
Otherwise, remove your popovers from the oven and allow to cool for a couple of minutes, then remove from the pan.

Back to the Filling:
While the popovers are baking, spray a sauce pan with non-stick spray and melt the 2-3 T butter over medium heat.

While the butter is melting, you can pour the milk into a glass measure and heat in the microwave until hot but not boiling.

When the butter is melted, sprinkle in the 3 T flour and whisk vigorously with a flat whisk for 2-3 minutes.


Add the marjoram, thyme, and fresh ground black pepper to taste. Still whisking, pour the hot milk into the butter-flour mixture all at once. Continue to whisk, breaking up any lumps and being sure to get into the edges of the pan. Add the chicken bouillon cube, and break apart with the whisk (the Knorr ones are large and soft, so easy to incorporate).

The sauce should thicken up in a minute or two.

Voila! It's sauce now!

Add the peas & carrots and chicken to the sauce. Thin to desired consistency with chicken broth, if needed. Cook, stirring from time to time, until heated through. DO NOT COVER. (See NOTE below.)


By now, the popovers should be out of the oven.

For each serving, split a popover in half and gently nudge the insides around to form a hollow for the sauce.

Ladle the sauce over the popover halves. Some chopped fresh Italian parsley or chives sprinkled on top would be nice, but I didn't think of that until now.

DS's plate:


NOTE: There is a small window of time when the peas will be fairly tender yet still vibrantly green. You want to time it so the popovers are coming out of the oven just as you are adding the vegetables to the pan. If you cover the pan, or if you cook or hold the sauce for too long, your peas won't be pretty anymore.

I recall, as a new bride, proudly bringing a rather pretty casserole (or "hot dish" as it was called in Wisconsin) to a church dinner and being horrified upon lifting the lid to discover that my formerly vibrantly green veggies had turned a sad shade of olive drab. "But it was green when I left the house!!" I said. My friend Steve, glancing from the dish to my stricken face, quipped, "How Green Was My Hot Dish!" and quickly moved out of smacking range.

Happy memories, and Buen Provecho!

Thursday, October 14, 2010

And Then That Rooster Came In Our Yard!


Oh my goodness, I have eaten so much chicken lately I feel like I'm going to start clucking any minute now!! Don't get me wrong, I love chicken-- but it's getting hard to think up new and exciting things to do with it. It's been on sale a lot lately, and I guess I stocked up more than I realized!

Every time I open the freezer and see still MORE chicken, I think about the old song we used to sing at summer camp. You probably know it too!


We had a chicken, no eggs she laid,
We had a chicken, no eggs she laid.
And I said, "Honey, we're losin' money,
'cause that chicken, no eggs she laid."

And then that rooster came in our yard
And caught that chicken right off her guard!
And we have EGGS now, just like we used to!
Ever since that rooster came in our yard.

Each verse gets more ludicrous, from the cow who gave no milk (and we have EGGNOG, just like we used to...) to the gum tree that gave no gum (and we have CHICKLETS just like we used to...) to the Chinese acrobat who did no tricks (and we have EGGROLLS just like we used to...), thanks to that er, helpful rooster!

I kinda wish that rooster would stay out of my freezer! And take the spirit of Herbert "A Chicken in Every Pot" Hoover with him!


To counteract the "I've Got WAY Too Much Chicken Blues,"

I made an oldie but a goodie from my ancient Cheap Eats cookbook, by the women who used to bring you "30 Minute Meals" in Bon Appetit, Brooke Dojny and Melanie Barnard. (Maybe they still do. My subscription lapsed ages ago.) Rachael Ray probably wasn't even born yet! Well, maybe she was, as I do recall that DS was in his high chair when I acquired this book.


I am rather fond of this little cookbook, which is subtitled "Simple, Sumptuous Meals For Four You Can Make for Under $10." That loud clunk you heard just now was probably Coupon Mom, fainting, since she makes meals for her family of 4 for under $3!! The fun thing about the cookbook is that it's organized by the season of the year and gives complete menus with recipes that are appropriate for the time of the year. Presumably this is because fresh, local and seasonal food would be less expensive. Since dreaming up side dishes is always such a bore, I love the menu feature!

To break out of my chicken rut a bit, I made this simple but unusual recipe from Cheap Eats: Chicken With Garlic Vinegar Sauce. (Shhhhh!! Don't tell anyone, but it's from the Spring section of the book.) DS, who is as fond of intense flavor as I am, loves this recipe. And why not? He was born in the year of (you guessed it!) The rooster!

Despite its humdrum name, this dish is a real change of pace. It's hard to believe something so delicious could come from such simple ingredients. The authors state that "This is an easy-to-make but absolutely stunning dinner for family or special guests. The chicken and the potatoes are inspired by the gutsy, delicious food served in romantic French Bistros."
To me, this dish has a vaguely Spanish flavor. It certainly is gutsy!

The other suggested dishes on the menu include Roasted Parmesan Potatoes, Steamed Asparagus, and Lemon Custard Mousse. I prefer this dish served over a neutral-flavored grain like rice because the sauce is so wonderful you need something to sop it up with! Alas, no asparagus or lemon mousse for us. I served the chicken on a bed of whole grain white rice (?? that's what the label said!) with the frozen veggie du jour.

I forgot to take pictures, but it's no great loss since like many stews, this is not a particularly photo-worthy dish.

Chicken With Garlic Vinegar Sauce
from Cheap Eats


Serves 4

2 1/2-3 lbs. cut-up chicken parts (see note)

1/4 t. salt
1/4 t. black pepper
3 garlic cloves, minced (I used more, of course!)
1/2 t. dried thyme leaves
1/2 t. dried rosemary
3 T red wine vinegar (see note)
1 16 oz. can stewed tomatoes (good luck finding THAT nowadays! I made do with my 14 oz. can)

1. Season the chicken with the salt and pepper. Heat the oil in a large skillet. Add the chicken and saute over medium-high heat, turning, for about 10 minutes, or until browned all over. Use tongs to remove the chicken to a plate. Pour off all but 1 T of drippings.
2. Add the garlic, thyme, and rosemary to the skillet and cook over low heat for 1 minute, stirring constantly to prevent the garlic from burning. (Indeed. it can burn slap up quicker than you would think!) Add the vinegar and simmer, stirring, for 2 minutes. Add the tomatoes and their juices, breaking up large chunks of tomatoes with the back of a spoon. (Hallelujah for canned diced tomatoes!)
3. Return the chicken to the skillet, skin side up, also add any juices that have accumulated on the plate (see note). Partially cover the pan and simmer over low heat for 10 minutes. Uncover and simmer 5-8 minutes longer, until the chicken is cooked through with no trace of pink near the bone, and the sauce is slightly reduced and thickened. Spoon off any excess fat that may have risen to the surface. Taste and season with additional salt and pepper if needed.

That's all there is to it!


Here are my notes:

1. I used split breasts for this recipe, but boneless, skinless chicken also works quite well. If you use skinless chicken, the dish is a tad less flavorful, but you won't have to worry about draining or skimming off any excess fat. (It would also make Dr. Oz happier.)
2. I had run out of red wine vinegar, so I used 1 T balsamic vinegar and 2 T white wine vinegar. You could experiment with different kinds of vinegar to see what you prefer. This combination was quite delicious.
3. I also am apparently out of stewed tomatoes, so I used plain diced tomatoes. I added 1 t. of brown sugar to the skillet to compensate.
4. I am sure I don't need to tell you this, but since I would hate for anyone to get food poisoning, I'm going to anyway. Make sure you thoroughly wash the plate the chicken was on in plenty of hot soapy water before using it again-- to avoid the possibility of cross-contamination with other foods. Both the prevalence and virulence of food-borne pathogens is just scary these days!

Er, uh, Bon appetit!

Wednesday, September 29, 2010

Easy Breezy Shrimp Pasta

There are days for lovingly simmering pasta sauce for hours. Then there are days like today, when we leave the house in the morning and don't return until 11 hours later, famished. This recipe is a tried-and-true lifesaver for a busy day. Quick, delicious, easy. I've been making it for years. Using bottled pasta sauce as the base saves mucho tiempo-- and the ingredients you add will make it taste as good as homemade.

Some of my ingredients:

I LOVE that the wine is called French Maid!! (Hey, it was on sale!)

The great thing about this recipe is that it is very flexible and you can vary the ingredients depending on what you have on hand. No shrimp? Chicken works fine. So do those frozen meatballs. No peppers? No problem. Just leave 'em out. Want to use fresh herbs instead of dried? Go right ahead-- just wait to add them until the last minute or so of cooking. I've used linguine here, but you can use whatever kind of pasta you like. Also, we love things SPICY. If you don't, use a smaller amount of pepper flakes.


The shrimp version is a big favorite of DS's and we haven't had shrimp in quite a while. Since I got both the pasta and bottled pasta sauce FREE with coupons, I decided to splurge on the shrimp (on sale for half price). Actually, I got ALL the ingredients at a discount-- so I made this dish in poco tiempo for poco dinero!

Unfortunately, this dish is kind of like me: not very photogenic! You'll just have to take my word for it that it's delicious. Everything just looks kind of.... orange... yes, that largish orange thing towards the bottom is a piece of eggplant.


Need a meal on the table pronto? Try


Hellzapoppin' Shrimp Linguine
by DomesticMuse

1 lb. linguine or pasta of choice (I used whole wheat linguine)
2 T extra-virgin olive oil
1/4 t. red pepper flakes (more to taste)
1 onion, diced
1 sweet bell pepper, diced (I used red, you can use green, orange... or none.)
4 cloves garlic, minced
1/2 small eggplant, peeled and diced (see notes below)
3/4 c. wine (I used white to go with the shrimp)
1 t. dried oregano
2 t. dried basil
1/2 t. dried thyme (fresh would have been really nice here, but I didn't have any)
1 jar pasta sauce (whatever kind you like. I used Newman's Own Sockarooni)
1/2 pasta jar of water
1 t. sugar
1 T balsamic vinegar
2 T capers
salt and fresh ground black pepper to taste
1 lb. raw medium shrimp, peeled

Put a large pot of salted water on to boil while you are getting the sauce ingredients ready. Set a large heavy skillet over medium heat.
When the onions are chopped, spray the skillet with nonstick spray and add the olive oil. Add the onions to the pan and saute until translucent. Add the peppers and saute for 2-3 minutes, then add the garlic and saute for about 1 minute (don't let it burn!). Add the eggplant and sprinkle with 1/2 t. salt. Saute for 3-4 minutes, until starting to get tender.
Increase the heat to medium high and add the wine. Bring to a boil, and cook until wine is almost completely evaporated. Add the oregano, basil and thyme and stir for about a minute.
Add the bottled pasta sauce. Fill the "empty" jar halfway with water, put the lid on tightly and shake to get all the remnants of sauce out of the jar. Add the water/sauce mixture to the pan, along with the sugar. Simmer uncovered for 10 minutes, until thickened.

Here's my sauce, starting to simmer


At this point, add your pasta to the boiling water and cook until al dente (7-9 minutes, depending on what kind you're using). Drain the cooked pasta.

Taste the sauce at this point to check the seasoning. When I tasted my sauce, it Needed Something. So I added 1 T of balsamic vinegar and more red pepper flakes. That did the trick. (A bit of grated orange zest would have been nice too, but I didn't have any oranges.) Now add the capers and stir. Add salt and pepper to taste.

Finally, reduce the heat to medium and add the shrimp. Stir until the shrimp is pink and cooked through, about 2 minutes. If you are using fresh herbs, add them now. When the shrimp is cooked through, add the pasta to the sauce and stir to combine. Remove from the heat and serve immediately.

Some chopped Italian parsley would have been a nice addition at this point, but I forgot to pick some up. By all means, feel free to add grated cheese if you like.

DS's bowl, up close & personal


NOTE: The basic components of this infinitely flexible sauce are 1)onion & garlic sauteed in olive oil, 2)protein & veggie(s) of choice, 3)wine or vodka, 4)Italian herbs (fresh or dried) of choice, 5)bottled pasta sauce of choice, 6)flavor booster of choice. Some components of the ingredients are only soluble in alcohol, so adding wine or vodka greatly enhances the flavor.
NOTE: if you are using boneless chicken, ground beef, or Italian sausage, brown these items first and remove from the pan, then proceed with the recipe. If you add the meat after or with the onion, it will never really brown because there's too much moisture in the pan. Add the browned meat or chicken back to the pan when you add the bottled pasta sauce. Frozen meatballs and can be dumped in when you add the pasta sauce.
NOTE: Many combinations of vegetables will work great here, depending on what you like. Peppers, mushrooms, eggplant, and zucchini in various combinations are all delicious. I have not had good luck with cruciferous veggies like broccoli or cauliflower, but you may.
NOTE: some of the "flavor boosters" we enjoy are capers, drained, marinated artichoke hearts, green or black olives, fennel seed (add with the other herbs), grated orange zest, & balsamic vinegar.
NOTE: it's really important to add only minimal amounts of salt as you go, because the sauce will get saltier as it thickens. A bit of salt draws the moisture out of eggplant and helps it cook better. Some ingredients, like capers or olives, are salty, too. You can always ADD more salt if the sauce needs it, but you can't take salt out! So wait until the sauce is pretty much done before adding salt to taste.

LET'S EAT!!

Monday, August 17, 2009

DF16: Gooey Grilled "Cheez" Sandwiches with Ham and Tomato

In addition to Tuna Melts, grilled sandwiches are another quick go-to meal for us. While I rarely make them only with cheese, the cheese is always a key ingredient in any combo, whether it's my fake muffalettas or I'm using up leftovers to create turkey with apple, brie, and walnuts. I can't bear to have to forego grilled sandwiches forever!

Luckily, there is a delicious solution in the Gooey Grilled Cheez sandwich recipe from The Ultimate Uncheese Cookbook. Instead of making a slicing "cheez," this one doesn't have to be made ahead of time and is more of a sauce-- well, actually stiffer-- maybe pate is the best word! It's super quick and best of all, we found it to be very, very yummy! THIS is what I will probably use from now on to top my tuna melts, rather than the Colby block "uncheese." Lisa Fowler's review on Amazon says she even uses this to put on pizza.

Here is the recipe:

Gooey Grilled Cheese


2/3 c. water
1/4 c. nutritional yeast flakes
2 T flour (any kind, your choice)
2T fresh lemon juice
2 T sesame tahini
1 1/2 T. ketchup
2 t. kuzu, arrowroot, or cornstarch
1 T sesame tahini
1 t. onion powder
1/4 t. each garlic powder, turmeric, dry mustard and salt
8 slices whole grain or gluten-free rice bread

Combine all ingredients, except bread, in a medium saucepan, and whisk until mixture is smooth.

Bring to a boil, stirring constantlywith the wire whisk. Reduce heat to low and cook, stirring constantly, until mixture is very thick and smooth. Remove from heat

Place 4 of the bread slices on a flat surface. Cover one side of each slice evenly with the cooked mixture. Top with remaining bread slices.
Grill in a large heave skillet misted with non-stick spray or coated with a small amount of vegetable oil or nonhydrogenated margarine. Brown each side well, carefully turning over once. Slice sandwiches in half diagonally and serve at once.

I misread the recipe and used 2 T cashew butter instead of tahini. I also found, as did Lisa Fowler in her review, that more ketchup and salt were needed. This time I did use the amount of lemon juice called for (2 T), and it tasted delicious!

Was it cheesey? Again, yes and no. The overall impression was one of cheese, but this thing too is its own deelicious self. To jazz up the sammies, I used my favorite Prairie bread and spread one half of the slices with mustard. I topped those pieces of bread generously with sliced ham and a nice big slice of tomato. On the other pieces of bread, I spread the "cheez" goo. Then I put the 2 halves together. Instead of my usual calorie-saving egg dip, I brushed the bread with melted butter. (I sprayed my griddle with non-stick spray). I did not have any trouble with the sandwiches falling apart, and with their delightful coating of butter, they browned beautifully. The rich taste of the butter served to heighten the illusion that we were eating melted cheese. The main thing missing was the stretch-- you know how wonderfully stretchy melted cheese gets! These sandewichs really were absolutely scrumptious. Even DS ate his.


I served the sammies with mugs of Tomato and Roasted Pepper soup. This too tasted "creamy" although there was not a drop of dairy in the soup! It was almost like my beloved cream of tomato soup. Very tasty!!

Color: 3 stars. It was certainly very cheddary-colored from the ketchup. Appetizing.
Texture: 3 stars. It was rich and creamy.
Cheese Flavor: 3 stars: The overall impression was cheesy.
Taste: 3 stars: Fabulous!! It was very savory and just plain yummy. While it does remind you of cheese, it is its own thing, too-- and a delicious thing worth eating again!
Overall: 3 stars: Superb!
DC-O-Meter: He loved it! 2 thumbs up


Sunday, August 16, 2009

DF15: Turkish Hamburgers and Girlichef's Salad


Hamburgers are always great weekend fare, especially when DS is here. Recently we've tried and enjoyed bison burgers. While leafing through Sheila Lukins's All Around the World cookbook, I found a recipe for "Great Turkish Hamburgers." This proved to be a blend of beef, lamb, and Turkish seasonings, so I was excited to try it. DC and DS are big lamb fans, and DC is practically addicted to gyros.

Side dishes for burgers are always a challenge for me, since I am supposed to take it easy on potatoes. Sweet potatoes are great, but we do get tired of them! When I saw Girlichef's recipe for warm Gemstone Potato and Greenbean Salad, I knew I had to try it!

A last minute inspiration was to make homemade pita bread instead of using the French rolls Sheila's recipe called for. Homemade pitas are so easy and so good! If you can make pancakes, you can make homemade pitas. There is no yeast in the recipe I use. The pitas were a great platform for the burgers and condiments. To go along with, I made a tomato salad dressed with garlic mayonnaise and thin strips of sauteed Anaheim peppers (the closest thing I could find to Italian frying peppers).

Here is Sheila's recipe for

Great Turkish Hamburgers
1 lb. ground sirloin
1 lb, ground lamb
1/4 c. coarsely ground onion
1 t. minced garlic
1 T extra-virgin olive oil
2 T. chopped Italian parsley
1 t. dried oregano
1 t. ground cinnamon (*I only used 1/8th t.)
1/2 t. ground cumin
1 t. coarse salt
1/2 t. ground black pepper
8 French bread rolls
Toppings:
Sauteed thinly sliced strips Italian frying peppers

Thinly sliced tomatoes
Thinly sliced shallots tossed with minced parsley

1. Place all the burger ingredients through the pepper in a large bowl and work with your hands to just combine. Do not overmix.
2. Form the mixture into 8 oval patties about 3" long, 2" across, and 1" thick. (I just formed them into large hamburger patties)
3. Grill, broil or panfry the patties, 8 minutes on the first side and 5 minutes on the second side.

Side 1

Side 2


4. Meanwhile, split the French rolls in half and remove some of the excess bread from the centers.
5. Place the patties in the rolls and serve immediately with a platter of the toppings.

These burgers were really yummy! I ended up using 1 lb. of ground sirloin and 1/2 lb. of ground lamb, since that's what I had on hand. Also, I am not a huge fan of cinnamon in meat dishes, so I added only a tiny bit to the burgers.


To make Girlichef's salad, I first created a dressing to toss with the hot vegetables. In the bottom of a serving bowl I combined 6 T. extra-virgin olive oil, 2 T. white wine vinegar, 1 t. salt, freshly ground pepper, 1 clove crushed garlic, and 1 t. dijon mustard. As Heather says, adjust the proportions of these ingredients to suit your taste.


Next, I cooked the potatoes and green beans. Of course, there were no gemstome potatoes at my market, but the baby Yukon golds looked delicious.

Finally, combine the hot vegetables with the dressing and toss well.

Easy, and delicious! Unfortunately, my green beans quickly turned a shade of army green, but they were still quite tasty!

We absolutely loved the salad! I am therefore bestowing the coveted Tasty Award upon Girlichef for her delectable recipe.
Thanks for sharing your tasty recipe, Heather!! :)

Here's a shot of my homemade pitas. The top one looks like a smiley face! See my earlier post for the recipe.


Tomato salad with garlic mayonnaise for topping the burgers:

Fried pepper strips:


To serve, I placed a pita on the plate, then added a burger and topped generously with the tomato salad. I added the sliced peppers. The green bean and potato salad went alongside. I really loved eating my pita-- all the yummy juices and seasonings had soaked into it, and it was so good. Alternatively, I could have wrapped the burgers in the pitas, gyro-style. But since we were eating on our laps, this arrangement was a little easier. With all the delicious flavors and toppings, we didn't even miss the cheese on our burgers!

DC's plate:

Chi miigwetch SCL: thank you to my son for creating this logo
CLICK to enlarge image