Wednesday, September 29, 2010

Easy Breezy Shrimp Pasta

There are days for lovingly simmering pasta sauce for hours. Then there are days like today, when we leave the house in the morning and don't return until 11 hours later, famished. This recipe is a tried-and-true lifesaver for a busy day. Quick, delicious, easy. I've been making it for years. Using bottled pasta sauce as the base saves mucho tiempo-- and the ingredients you add will make it taste as good as homemade.

Some of my ingredients:

I LOVE that the wine is called French Maid!! (Hey, it was on sale!)

The great thing about this recipe is that it is very flexible and you can vary the ingredients depending on what you have on hand. No shrimp? Chicken works fine. So do those frozen meatballs. No peppers? No problem. Just leave 'em out. Want to use fresh herbs instead of dried? Go right ahead-- just wait to add them until the last minute or so of cooking. I've used linguine here, but you can use whatever kind of pasta you like. Also, we love things SPICY. If you don't, use a smaller amount of pepper flakes.


The shrimp version is a big favorite of DS's and we haven't had shrimp in quite a while. Since I got both the pasta and bottled pasta sauce FREE with coupons, I decided to splurge on the shrimp (on sale for half price). Actually, I got ALL the ingredients at a discount-- so I made this dish in poco tiempo for poco dinero!
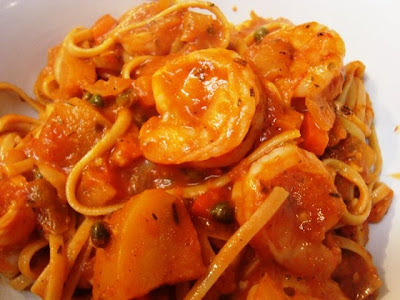
Unfortunately, this dish is kind of like me: not very photogenic! You'll just have to take my word for it that it's delicious. Everything just looks kind of.... orange... yes, that largish orange thing towards the bottom is a piece of eggplant.


Need a meal on the table pronto? Try


Hellzapoppin' Shrimp Linguine
by DomesticMuse

1 lb. linguine or pasta of choice (I used whole wheat linguine)
2 T extra-virgin olive oil
1/4 t. red pepper flakes (more to taste)
1 onion, diced
1 sweet bell pepper, diced (I used red, you can use green, orange... or none.)
4 cloves garlic, minced
1/2 small eggplant, peeled and diced (see notes below)
3/4 c. wine (I used white to go with the shrimp)
1 t. dried oregano
2 t. dried basil
1/2 t. dried thyme (fresh would have been really nice here, but I didn't have any)
1 jar pasta sauce (whatever kind you like. I used Newman's Own Sockarooni)
1/2 pasta jar of water
1 t. sugar
1 T balsamic vinegar
2 T capers
salt and fresh ground black pepper to taste
1 lb. raw medium shrimp, peeled

Put a large pot of salted water on to boil while you are getting the sauce ingredients ready. Set a large heavy skillet over medium heat.
When the onions are chopped, spray the skillet with nonstick spray and add the olive oil. Add the onions to the pan and saute until translucent. Add the peppers and saute for 2-3 minutes, then add the garlic and saute for about 1 minute (don't let it burn!). Add the eggplant and sprinkle with 1/2 t. salt. Saute for 3-4 minutes, until starting to get tender.
Increase the heat to medium high and add the wine. Bring to a boil, and cook until wine is almost completely evaporated. Add the oregano, basil and thyme and stir for about a minute.
Add the bottled pasta sauce. Fill the "empty" jar halfway with water, put the lid on tightly and shake to get all the remnants of sauce out of the jar. Add the water/sauce mixture to the pan, along with the sugar. Simmer uncovered for 10 minutes, until thickened.

Here's my sauce, starting to simmer


At this point, add your pasta to the boiling water and cook until al dente (7-9 minutes, depending on what kind you're using). Drain the cooked pasta.

Taste the sauce at this point to check the seasoning. When I tasted my sauce, it Needed Something. So I added 1 T of balsamic vinegar and more red pepper flakes. That did the trick. (A bit of grated orange zest would have been nice too, but I didn't have any oranges.) Now add the capers and stir. Add salt and pepper to taste.

Finally, reduce the heat to medium and add the shrimp. Stir until the shrimp is pink and cooked through, about 2 minutes. If you are using fresh herbs, add them now. When the shrimp is cooked through, add the pasta to the sauce and stir to combine. Remove from the heat and serve immediately.

Some chopped Italian parsley would have been a nice addition at this point, but I forgot to pick some up. By all means, feel free to add grated cheese if you like.

DS's bowl, up close & personal


NOTE: The basic components of this infinitely flexible sauce are 1)onion & garlic sauteed in olive oil, 2)protein & veggie(s) of choice, 3)wine or vodka, 4)Italian herbs (fresh or dried) of choice, 5)bottled pasta sauce of choice, 6)flavor booster of choice. Some components of the ingredients are only soluble in alcohol, so adding wine or vodka greatly enhances the flavor.
NOTE: if you are using boneless chicken, ground beef, or Italian sausage, brown these items first and remove from the pan, then proceed with the recipe. If you add the meat after or with the onion, it will never really brown because there's too much moisture in the pan. Add the browned meat or chicken back to the pan when you add the bottled pasta sauce. Frozen meatballs and can be dumped in when you add the pasta sauce.
NOTE: Many combinations of vegetables will work great here, depending on what you like. Peppers, mushrooms, eggplant, and zucchini in various combinations are all delicious. I have not had good luck with cruciferous veggies like broccoli or cauliflower, but you may.
NOTE: some of the "flavor boosters" we enjoy are capers, drained, marinated artichoke hearts, green or black olives, fennel seed (add with the other herbs), grated orange zest, & balsamic vinegar.
NOTE: it's really important to add only minimal amounts of salt as you go, because the sauce will get saltier as it thickens. A bit of salt draws the moisture out of eggplant and helps it cook better. Some ingredients, like capers or olives, are salty, too. You can always ADD more salt if the sauce needs it, but you can't take salt out! So wait until the sauce is pretty much done before adding salt to taste.

LET'S EAT!!

Monday, September 27, 2010

Is It Worth It To Clip Coupons?

I started my coupon experiment in January to see if I could do anything about lowering my astronomical grocery bill. I should mention that my groceries mostly consisted of organic meat, poultry, fish & dairy items, fresh produce, whole grains, baking supplies, and condiments. I did not purchase much in the way of packaged snack foods (except for DS's school lunches), beverages, or convenience foods. I was very skeptical about whether using coupons would do me any good.

While it is true that you won't generally see coupons for items like chicken and fresh produce, I have been able to lower my grocery bills substantially by observing a few tips.

First of all, the main idea is to
  • Use coupons to enhance a TRUE sale
By doing this you will generally save 50% 0r more on the items you purchase.

So let's break this idea down:
  • Maximize your savings by pairing a coupon with a sale item.
  • A rule of thumb is, do not purchase an item unless it is on sale and you have a coupon.

The second key part is recognizing a TRUE sale. Lots of store ads will feature "sale" items whose sale price is not that much better than the regular price. Grocery items have a price cycle that is generally about 12 weeks long. At some point during that cycle, the price of that item is going to hit rock bottom. THIS is when you want to buy--
  • BUY when the item is at its lowest price and you have a coupon.
Obviously, you should not purchase items you will not use, even if you have a coupon. (Though I'm sure I don't have to tell you this!)

How do you know when an item is at its lowest price? Well, one way is by just being familiar with the prices of the items you purchase most often. Coupon Mom suggests taking this a step farther by keeping a "price book" to track the prices. In your price book, you would list the item, the date, the price, and the store. There are various ways to organize your price book. One way is to use a page for each item, so you can track the prices easily over time. Is this tedious? Yes. But knowing when to buy can save you A LOT of money.

An easier way to do this is to refer to Coupon Mom's weekly list for the deals at your particular store. This list is great because it's a)free to use, b)correlates available coupons with the sale items for that week at your store, and c)shows you the percentage you will save with the coupon. You can figure that anything that will give you a savings of at least 50% when you use a coupon is probably a pretty good deal.

The next important idea is one I got from Coupon Mom's book.
  • When is the WORST time to buy something?
  • When you need it!!
If you've run out of mayonnaise and you have to go out and buy a jar, you will probably end up paying full price for it. You may save a bit by purchasing the store brand. However, consider this: if you had been tracking the price for Hellmann's (in my opinion the best, and usually most expensive, brand), waited for it to go on sale for its rock bottom price and THEN purchased it with a coupon, (even though you didn't NEED mayonnaise at that point), you would have saved a bundle over the store brand price, PLUS you would have a higher quality product.
  • When an item is at its lowest price and you have coupons for it, buy more than you need.
  • This way, you will always have a stash of the items you use, at greatly discounted prices, and you will not have to pay full price the next time you need them!
I think of this as the "pantry" or "stockpiling" principle.

*TIP: SAVE, don't clip. Pull out the coupon inserts from your Sunday paper, and write the date on the top of them. Save them, and just clip the coupons you need before you head to the store. Coupon Mom's list is ideal for this, as it gives the name and date of the insert in which the coupon appeared. E.g., R 9/19: that means the coupon is in the Sept. 19 Red Plum insert.

The great thing about this method is that you don't have to organize a giant pile of clipped out coupons every week. Plus, you never know when you might want a coupon for something that you hadn't anticipated. By saving the entire coupon insert, you have ALL the coupons for each week!

*TIP: To help with stockpiling when items are at their best price, it's worth it to collect extra copies of the coupon inserts each week. When I first started out, I tried to have 4 copies of each for every week. You can do this by purchasing an extra newspaper subscription, asking friends/family to save inserts for you, or just buying an extra copy of the Sunday paper at the store. That way, when that joyous day comes when Sale Price + Coupon = FREE ITEM, you will be able to get MULTIPLE free items because you will have multiple coupons for that item!

My mom lives in a retirement home and every Sunday, she LOVES to run around picking up all the extra coupon inserts she can find for me. (Her fellow residents don't use them.) It's a great way for her to know she's doing something nice for DS and me without having to spend any money.

Plus, when I find things I know she likes that are on sale, I am able to purchase them for her with my extra coupons! She loves the Lavender/Vanilla Febreeze Air Effects room spray, but told me she doesn't buy it very often because it's "expensive." Imagine her delight when I was able to present her with 4 bottles of it, that I had paid next to nothing for with coupons!

You may be wondering, how does this all work? Or, could this really work for me? Let me use a recent shopping trip as an example.

This past week, God bless 'em, the Teeter had "Super Doubles." Normally, they will double the face value of a coupon up to 99 cents. During Super Doubles week, they double the face value up to $1.98!! That means if you have a $1.50 coupon, you will save $3 on the item!

I purchased 32 items. Most of these were for DS's school lunches. I had coupons for all but 2. I bought:
1 jar of Truvia sweetener
2 boxes Fiber One Chewy Bars
2 boxes Betty Crocker Fruit Gushers
2 boxes Nature Valley Trail Mix granola bars
2 pkg Keebler Deluxe Fudge Grahams
1 Gain dish liquid
6 cans Progresso soup
2 boxes Ritz Munchables
1 pkg Old El Paso Taco shells (no coupon, but on sale for 95 cents each, regular price $1.99 = 52% savings)
1 pkg Old El Paso tortillas (same)
24-pack of Deer Park water (had a rain check from when item was on sale for $2.99)
2 South Asia noodle bowls
1 Colgate Total Advanced Whitening toothpaste
3 pkg Pillsbury Toaster Strudels
1 Wanchai Ferry frozen meal kit
1 can Pillsbury cinnamon roll dough
1 can Pillsbury orange danish dough
1 pkg John Morrell Hot Off the Bone sliced chicken
1 Dayquil Mucus Control

Let me highlight a few of these items.
Colgate Total Advanced Whitening toothpaste, 4 oz.
Regular price: $3.39
Sale price: 2 for $5 ($2.50 ea.)
Coupon: $1 (from 9/12 SmartSaver)
$2.50 (sale price)
- $2.00 coupon (coupon doubled, so worth $2)
= $0.50 final price, savings of 85%

John Morrell Hot Off the Bone Sliced Chicken, 8-10 oz.
Regular price: $4.99
Sale price: BOGO ($2.49 ea)
Coupon: $1 (from 8/29 SmartSaver)
$2.49 (sale price)
- $2.00 (doubled coupon value)
= 49 cents final price, savings of 90%

2 Simply Asia Noodle Bowls, 8.5 oz.
Regular price: $3.19 ea.
Sale price: BOGO
Coupon: $1 on 2 (from 8/29 Red Plum)
$3.19 (sale price for 2 bowls)
- $2 (doubled coupon value)
= $1.19, final price for 2 bowls, 60 cents each, savings of 81%

Dayquil Mucus Control, 10 oz.
Regular price: $6.99
Sale price: $3.49 (close out)
Coupon: $1.50 (from 8/29 Proctor & Gamble)
$3.49
- $3.00 (doubled coupon value)
= 49 cents final price, savings of 93%

I was also able to take advantage of an additional promotion going on for General Mills: Buy 20 General Mills items in one transaction, get $6 deducted from your total bill before tax.

Here are the stats for this trip:
Original price: $117.78
-Store sales: $44.22
-Coupons: $30.99
-GM promo: $6
Final price: $36.57
$ saved: $81.21
% saved: 69%

So, is it worth it? YES!!

Monday, September 6, 2010

The Tempeh Tempest!

We celebrated Labor Day early by having a feast yesterday. DS has to get up sooooooo early in the a.m. for school that celebrating tonight wasn't really an option. So yesterday, as often happens, my BFF, Todd, and I called each other at the exact same time to suggest getting together for dinner. So, dinner and a movie at my house was the plan. Over the years, we have spent many an enjoyable afternoon Doing Something (like going to a pottery festival or the art museum) and then cooking dinner together afterwards. Todd even cheerfully watched every episode of Glee in my DVD set this summer.

Here are Todd & DS at the Sanford Pottery Festival:

I'm pretty sure this was the day we whipped up Dee's fabulous Easy Sour Cream Enchiladas and some borracho beans to go with 'em back at my house post-festival.

Girlichef has one of the most awesome food blogs on the planet (if you haven't been there, check it out ASAP!) . I remember when her blog had a cute subtitle referencing her "fun-size kitchen." Well, my kitchen is so small I'm not sure it even qualifies as "fun-size!" It really kinda drives me nuts. You get out two bowls and an ingredient or two, and the whole place is trashed. Uff-da!!

Due to the difficulty of preparing ANYTHING in what passes for my kitchen, our feast was somewhat minimalist. I made 2 dishes from the Veganomicon: Hot-Sauced Glazed Tempeh, and Pineapple-Cashew-Quinoa Stir-fry. (I chose these recipes because I had most of the ingredients on-hand already! Hey, it's Labor Day-- I didn't want to be laboring all day at the grocery!) For dessert, we had sorta-vegan crepes. Todd, just returned from a trip to Michigan to visit his fam, brought us back some Vernor's (America's oldest soft drink) to go with. His last 2 bottles in fact: what a pal!

The Hot-Sauce Glazed Tempeh from the Veganomicon is out of this world! I have to tell you, tempeh is one of those "whole foods" I have just never been able to get behind. Todd (who mostly eats vegetarian) also suffers from Tempeh Terror.

Tempeh is a cultured/fermented soy product. I know it's supposed to be good for you with all those "cultures" in it (that probiotic stuff). To me, it always tasted bitter and of raw beans. Disgusting, really. However, in the skilled hands of the Veganomicon chefs, tempeh is transformed into something so truly delicious I would welcome it at my table just about any time.

I think the secret is the one extra step I had never before heard of when preparing tempeh: you have to par-boil it before cooking. That gets rid of that nasty raw bitter taste, and it improves the texture immensely.

If you have never been that crazy about tempeh, you've gotta try this fabulous recipe! It just might turn your Tempeh Terror into Tempeh Triumph.

Hot-Sauce Glazed Tempeh from the Veganomicon

1 8 oz. pkg. tempeh (*I used the LightLife 3-Grain variety)
1/2 c. wine (whatever you've got on hand, just nothing sweet, Manischewitz lovers!) (*I used some Merlot)
1/4 c. hot sauce (*I used my fav, Cholula)
2 T olive oil
2 T soy sauce
3 T fresh lemon juice (juice of 1 lemon)
2 cloves garlic, crushed (*I used 4-- you can never have too much garlic!)
1 t. ground cumin
1/2 t. dried oregano
1/8 t. cayenne (we know, with hot sauce? Yes.)

Bring a medium pot of water to a boil.
Whisk all the marinade ingredients together in a bowl large enough to fit the tempeh slices. (*I find it is easiest to place the marinade ingredients and the tempeh in a large zip-top bag to marinate.)
Cut the tempeh in half, widthwise, then cut each of the resulting squares diagonally to form four large triangles. When the water is boiling, lower the heat to a simmer, and cook the tempeh triangles for 10 minutes. This steams the tempeh and removes any bitterness, plus readies the tempeh to absorb the marinade. (*I'm here to tell you. it really does. I boiled mine for 15 minutes just to be sure.)
Use tongs to immediately place the tempeh in the marinade bowl. Let marinate for 1 hour, flipping the tempeh every now and again to cover with the marinade.

Here's my tempeh, marinating:


Grilling Instructions:
Preheat a cast-iron grill pan over medium-high heat. To grease it, brush lightly with olive oil or, if you have a spray bottle of olive oil, that works, too. (Get a spray bottle of olive oil already!)
Grill each side of the tempeh for5 minutes. When the second side is almost done, spoon some of the marinade over the tempeh and let it cook for 30 more seconds. (*I am a believer in frequent basting: we brushed our tempeh with marinade right after we put it in the pan, just before turning, and just before removing from the heat.)

Serves 2 as a main dish, 4 as a side.

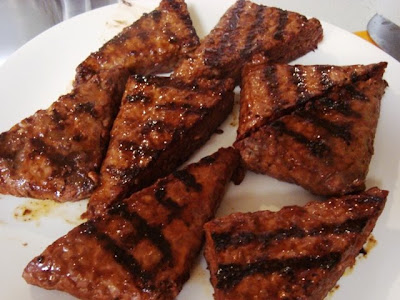
Ta-da!! Here is our succulent glazed and grilled tempeh (Todd did the grilling using my cast-iron grill pan):


The Pineapple-Cashew-Quinoa Stirfry from the Veganomicon was a flavorful and delicious sidekick for the tempeh. I admit, I cheated and used canned pineapple tidbits (and juice from same) instead of fresh, but it was still very tasty. I am sure it would have been better with fresh, but it was still pretty awesome.

Todd graciously supplied us with fresh basil and mint from his garden, as well as bringing the potables (iced tea and Vernors). If you have some cooked quinoa already on hand, this would go together very quickly. Cooking the quinoa in pineapple juice is a great touch and adds a lot of flavor. I used red quinoa instead of the usual gold kind, because I prefer the flavor of the Inca Red (and besides, it comes pre-rinsed!).


Pineapple-Cashew-Quinoa Stir-Fry from the Veganomicon
Quinoa: 1 c. quinoa, well rinsed and drained
1 c. pineapple juice

1 c. cold water

1/4 t. soy sauce

Stir-fry:

4 oz. cashews, raw and unsalted

3 T peanut oil (*I didn't have any, so I just used canola oil)

2 scallions, sliced thinly

2 cloves garlic, minced (*I used 4)

1 hot red chile, sliced into very thin rounds

1/2 in. piece ginger, peeled and minced (*I used a 1" piece)

1 red bell pepper, seeded and diced

1 c. frozen green peas or cooked edamame (*I used a box of frozen peas, thawed)

1/2 c. fresh basil leaves, rolled and sliced into thin shreds (just like slicing collard greens)

2 T fresh mint

10 oz. fresh pineapple, cut into bite-size chunks, about 2 c. (*I used a 14 oz. can of tidbits)

3 T soy sauce

3 T vegetable stock

1 T mirin (*didn't have any, used tawny port instead)

Lime wedges for garnish


Prepare the quinoa first: combine the quinoa, juice, water and soy sauce in a medium-size pot. Cover, place over high heat, and bring to a boil. Stir a few times, lower the heat to medium-low, cover, and cook for 12-14 minutes, until all the liquid has absorbed and the quinoa appears plumped and slightly translucent. Uncover, fluff, and let cool.
For best results, place the quinoa in an airtight container and refrigerate overnight. If you're in a hurry, chill the cooked quinoa for at least an hour. When ready to use, break up any chunks of the cold quinoa with a fork.

(*NOTE: I didn't bother chilling the quinoa, and the finished product turned out fine.)

Prepare the Stirfry:
Use the largest non-stick pan you have (at least 11 in. oin diameter) or a wok. Have all of your ingredients chopped and easily within reach. Place the cashews in the dry pan and heat over low heat, stirring them, until lightly toasted, 4-5 minutes.

Remove the cashews from the pan, raise the heat to medium, and and add the peanut oil, scallions, and garlic. When the garlic starts to sizzle, add the sliced chile pepper and ginger. Stir-fry for about 2 minutes, then add the bell pepper and peas. Stir-fry for another 3-4 minutes, until the pepper is softened and the peas are bright green. Add the basil and mint, and stir for another minute before adding the pineapple and quinoa.
In a measuring cup, combine the soy sauce, vegetable stock, and mirin. Pour over the quinoa mixture. Stir to incorporate completely and coat the quinoa. Continue to stir-fry for 10-14 minutes, until the quinoa is very hot (it helps to use two spoons/spatulas to scoop the quinoa around).
Serve with lime wedges and additional soy sauce, to season individual servings to taste.
Serves 4.

Here is the finished stir-fry in the skillet. All the colors and textures are so pretty!


This stuff was fantastic. I was really happy that (besides fresh pineapple), the only things I didn't already have on hand were the scallions, peas, and fresh herbs, the latter which Todd had growing in his garden.

To maximize the flavor and prevent overcooking, I added the basil, mint, and peas just before serving. Ditto the cashews, which were never mentioned again after the roasting instructions, but which I assume were supposed to be added to the finished dish. The crunch of the cashews and the tangy bite of the lime juice really added a nice touch to the finished dish.

Todd's plate:


Dinner conversation:
ME: Well, Todd, now that you have tried Hot-Sauce Glazed Grilled Tempeh, how you feel about tempeh?
TODD:

(You can see my tiny rat-hole of a kitchen behind Todd-- we don't even have enough storage space for the food wraps, so they're all in a heap on top of the fridge)


This meal was satisfying but not too heavy-- all the better to enjoy our crepe-making (and devouring) experience after dinner!

Sorta Dairy-Free Crepes by DomesticMuse
(based on a Sara Moulton recipe)

Makes 8-10 small dessert crepes

1/2 c. + 2 T vanilla almond milk
2 eggs
1 1/2 T melted butter
1 T sugar
1/2 c. all-purpose flour
pinch of salt

1. Combine the batter ingredients in a blender and blitz for about 5 seconds to mix. Then scrape down the sides and blend for 20 seconds. Transfer the batter to a small, deep container.
2. Brush an 8" non-stick skillet with vegetable oil and spray with nonstick spray and heat over medium heat until a drop of water sizzles on contact.
3. Fill a 1/4 c. measure about 2/3 full with batter and pour into the prepared skillet. Swirl the skillet to coat the bottom with a thin layer of batter. Pour any excess batter back into the container.
4. Cook until the center of the crepe is set and the edges are lightly browned. Loosen the edges with a rubber spatula.
5. Turn the crepe over and cook until you see bubbles forming, about 30 seconds.
6. Remove crepe from pan and either cool on a rack or stuff and eat immediately.
7. Re-spray the pan with non-stick spray and repeat until you have made as many crepes as you need, re-spraying before you cook each crepe.

We stuffed our crepes with Nutella and bananas and/or strawberries. Some whipped cream and powdered sugar on top would have looked pretty, but I didn't think of that!

Here are Todd's finished crepes:


This was a fabulous meal!

Sunday, September 5, 2010

Vitameatavegamin??

Vegan food: does the very thought of it make you feel like this?

Or maybe this?


Not to worry. You really must try the Vitameatavegamin ... er, I mean, the Veganomicon: The Ultimate Vegan Cookbook by Isa Chandra Moskowitz and Terry Hope Romero.


As many of you know, I try to avoid dairy products as much as possible. I've been doing this for about a year now. Is it worth it?? ABSOLUTELY. After suffering for 20 years from sinus disease, I am pain-free and nearly symptom-free. It has been almost 14 months since my last sinus infection! This is a miracle, since I used to get them 4-5 times a year.

My quest for delicious dairy-free food has not been easy. One great place to find dairy-free recipes is the many vegan cookbooks you can find at your friendly neighborhood or online bookstore. Depending on how adventuresome you are feeling, you can definitely find some great, quick, tasty, and inexpensive dairy-free recipes. Of course, being vegan, they also tend to be meat- and egg-free as well. Since DS loves vegetarian food and will happily eat it, that's not an issue for us.

The Veganomicon is responsible for luring me back into the kitchen recently. I really do love this cookbook. It's very accessible, even for non-vegans. The writing style is sassy and fun, a big plus in my book. It's been so nice to feel excited about cooking again! Since I purchased this tome a year ago, we've tried several recipes from it. Some were great, some, not so much. But it is packed with creative and interesting recipes for everything from "Greek Tofu Benedict" to "Green Tea 'Ice Cream' Sammiches." I picked it up the other day looking for a dairy-free recipe for crepes, and DS spied some things he wanted me to try. All of them were fantastic!

Our first contestant was the Braised Seitan with Brussels, Kale, and Sun-Dried Tomatoes.

Naturally, if you hate brussels sprouts, kale, or seitan, this is not the dish for you. However, both DS and I adore just about any kind of greens (as long as they are prepared properly, no stewed spinach, please!) and we enjoy brussels sprouts as well. When Brussels are not drearily boiled to death, they can be very yummy, with a sweet and nutty flavor. Although for most people, seitan (sometimes called "wheat meat") is love at first bite, I have been a slow convert. The Veganomicon's recipe for homemade seitan is really what convinced me that seitan can actually be enjoyable (see recipe below). The dish below brings out the best in all the ingredients, creating some very delicious vegan magic!


Braised Seitan with Brussels, Kale, and Sun-Dried Tomatoes from the Veganomicon
2 T olive oil
6 shallots
2 c. seitan, sliced on the diagonal into bite-sized pieces
1/2 lb. Brussels sprouts, quartered (about 2 c. once sliced)
4 cloves garlic, minced (I used 6)
1/2 t. dried thyme (I used 1 t.)
1/2 t. dried basil (I used 1 t.)
1/4 t. dried tarragon
1/2 t. salt
Freshly ground black pepper
2 c. vegetable broth (I used Wolfgang Puck's, as it was on sale)
1/2 c. sundried tomatoes, chopped into bite-sized pieces (I find it is easiest to snip them with kitchen shears)
1/4 c. red wine (the authors say "any kind will do, really")
4 c. chopped kale (I used 1 bag frozen chopped collards)

Preheat a large, heavy-bottomed pan over medium-high heat. Saute the shallots and seitan in 2 T of the olive oil for about 7 minutes, until they have both browned. Add the brussels sprouts and saute for 3 more minutes, adding a little extra olive oil if need be. Add the garlic, herbs, salt and pepper and saute for another minute. Mix in the sundried tomatoes.

Add the vegetable broth and wine. Once this liquid is boiling, which should be pretty quick if the heat is right, add the chopped kale. Stir the kale until it is wilted. Cover the pan, leaving a little room for steam to escape, and lower the heat. Simmer for 5-7 more minutes. Taste and adjust the salt, and serve immediately.

Serves 4. Prep time: 30 min.


The authors recommend serving this over mashed potatoes, pasta, rice, or polenta. We served it over whole wheat penne. It really was very quick to prepare. Slicing up the seitan was the most time-consuming task. I added extra garlic and spices as noted above, and also substituted frozen chopped greens for the fresh kale. This saved a LOT of time and it was quite tasty as well. I was delighted because I had half a bag full of fresh Brussels sitting in the fridge (they were on sale) and wasn't quite sure what to do with them: this dish was a GREAT way to use them up! The only "luxury" ingredient was the sundried tomatoes, so this dish is also pretty inexpensive to prepare, particularly if you already have some sundried tomatoes in your pantry!

Somehow, all these flavors are magic together-- it does NOT taste like a giant pot of cabbage (which was my own personal fear about making this!). The brussels sprouts were pleasantly nutty and a bit crunchy, the seitan, chewy and savory, and the sundried tomatoes added the perfect bright, sprightly note to a dish intended to be, as the authors state, a "Fork You" to winter.


DS and I found this dish to be exceptionally tasty, and we will most certainly make it again.

DS's plate, before:


And after:


Oops, almost forgot! Here is the Veganomicon's recipe for homemade seitan.

How can you not love a cookbook where the intro to the recipe reads like so:
"This is the Vegan With A Vengeance seitan recipe simplified. After publishing that book, we got a lot of questions, often asking if one could substitute this, leave out that-- sometimes just asking how we got to be so beautiful. While we won't reveal our beauty secrets, we will present you with this bare-bones boiled seitan recipe with clearer directions, simpler ingredients, and just the right amount of seitan for most recipes in this book."

Simple Seitan

1 c. vital wheat gluten
3 T nutritional yeast (NOT Brewer's yeast)
1/2 c. cold vegetable broth
1/4 c. soy sauce (I had run out, so I used Worcestershire sauce)
1 T olive oil
2 cloves garlic, pressed or grated on a microplane grater

Broth:
8 c. cold water plus 3 vegetable bouillon cubes, or 4 c. broth plus 4 c. water
1/4 c. soy sauce (again, I used Worcestershire)

Mix together the gluten flour and yeast in a large bowl. In a smaller bowl, mix together the veggie broth, olive oil, soy sauce and garlic. Pour the wet into the dry and stir with a wooden spoon until most of the moisture has been absorbed and the wet ingredients are partially clumped up with the dry ingredients. Use your hands to knead the mixture for about 3 minutes, until the dough is elastic. Divide with a knife into three equal pieces and then knead those pieces in your hand just to stretch them a bit.

Prepare the broth:
Fill a stockpot with the water, bouillon cubes and soy sauce, and add the wheat gluten pieces. Cover and bring to a boil but watch carefully; you don't want it to boil for very long or the outside of the seitan will be spongy. Try to catch it as soon as it boils and then lower the heat as low as it will go so that it's at a low simmer.
Partially cover the pot so steam can escape and let simmer for an hour, turning the seitan occasionally. Turn off the heat and take the lid off; let sit for 15 minutes.
Remove from the broth and place in a strainer until it is cool enough to handle. It is now ready to be sliced up and used. If you have extra seitan, store in the cooking liquid in a tightly covered container.

As I said, this is the recipe that won me over to seitan. I had no idea you could make it so easily at home. My previous experience was with the expensive pre-packaged seitan from the health food store, which I always found to be salty, squidgy, and icky. This stuff is really easy to make. But PLEASE don't make the same mistake I did when I tried making it the first time: instead of kneading by hand, I used my stand mixer. The resulting product had the approximate texture of an old rubber boot. So, be sure to knead by hand! Also, DS and I actually enjoyed the flavor of the seitan prepared with Worcestershire sauce instead of soy sauce. You might want to give that a try.

!Buen provecho!

Yours in Domestic Bliss,
Karen

Chi miigwetch SCL: thank you to my son for creating this logo
CLICK to enlarge image